RFID projects have been pretty prominent recently, ranging from projects here in Instructables, to our local Silicon Chip magazine in Australia publishing a RFID door lock project in their November issue. Even I recently purchased a RFID door lock on eBay for $15 to lock my garage (so my front neighbor could get tools if he wanted to).
We have known that the cheaper RFID technologies were pretty insecure for a number of years. Researchers have demonstrated cloners of all varieties, but simple RFID tags are still being used for access control. Even my current employer uses them.
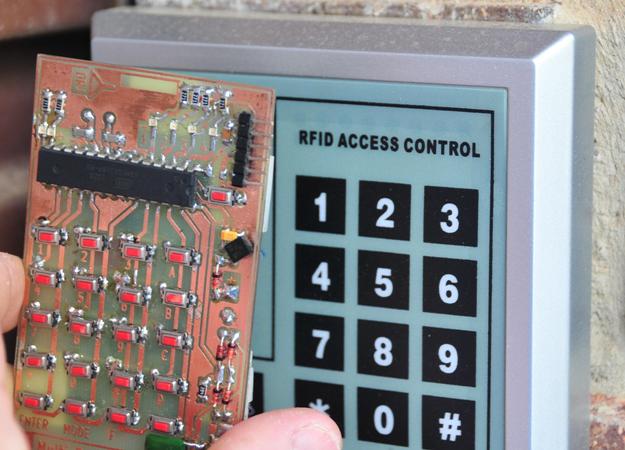
A while ago, I was looking at Hack A Day, and I saw an amazing project that somebody had made. It was an RFID card with a keypad on it. For the next couple of days, I couldn’t get the image of the card out of my mind; the project reminded me of how much I wanted to build a RFID spoofer myself. The original author didn’t release source code for their project, but they left enough clues that I could follow.
So, in typical fashion, I built my own reader hardware so I could have a look at the data from a card, and created my own version of the Universal RFID key.
The key I made works beautifully both on my garage door, as well as on a number of other readers I tried.
I have decided to publish this, as more people should be aware of the design flaws that are inherent in older RFID implementations, and to allow others to make their own universal key.
Will this key let you into anybodies RFID protected office? Yes it will, assuming a couple of things are true
1) The have to be using 125Khz RFID tags that use the same encoding standard as I have designed this project for, and,
2) You have to have access to the number printed on the back of the tag – with that number, you can simply key it into the Universal RFID key, and it will emulate that tag.
So there you go – I hope you enjoy making this project. – And remember, with great power comes great responsibility!
Here is a link to the full Instructables project – http://www.instructables.com/id/A-Universal-RFID-Key/ Alternately – the relevant source code is available HERE.


Hi there!
This is a great project you have taken on and been very educational for me.
I have a question though.. you have provided almost everything to build this spoofer but seemed to have missed the details on the crystal used for the board. Can you shed some light here?
Thanks again for this great post!
I too saw that article on Hack-a-Day, but have been too busy to focus on it as a project, so I am delighted to see that someone stepped in! I visited your instructable, and it is very well written, but viewers aren’t able to download files unless they log in. do you have the PCB and other files hosted anywhere else?
Thanks!
Yep – they are hosted here.
Hello!
Great project. You should specify which type of 125Khz system it emulates. EM4100, HID Prox cards, etc. If it emulates Prox cards, does it support various formats (26 bit, Corporate 1000, etc)?
Some questions:
-Is a parts list available?
-I assume the uP is powered by rectifying the signal from the reader (via bridge made up of D2-D5)? I saw the 7805 regulator but I assume this is just when using the debug port?
-Is the receive/transmit antenna the Inductor (L1)? Or are there traces on the board that function as the antenna (I don’t see any but figured I’d ask).
PS: I would be interested in seeing your homebrew reader you mentioned that you used to get the data off the card!
Thanks again, not many people are publishing this info online for us experimenters to learn from.
Hi – Thanks for the comments.
The software emulates an EM4100 card. With some software changes it could emulate HID, but I don’t currently have access to a HID card to identify the format changes.
The parts list is part of the Instructables article that I pointed to.
The micro is actually powered by a battery – I considered powering it from the loop, and decided that the battery was needed for local programming via the keypad. In another change, I did away with the 78L05, and simply used a set of CR2032 batteries to provide 6V – The device ran beautifully for a couple of weeks before the battery discharged (I would like to do some more testing with AtMega168 based projects to see how to get better battery life in sleep mode).
And – yep – inductor L1 is the rx/tx antenna.
The reader was simply the design published by Microchip for their RFID system – In my code, the manchester decoder is extremely unreliable (it takes multiple reads to get the data correctly) – so when I get that sorted correctly, I will publish it.
Great project! Very nice work!
I found the following information and I think it could be the solution you were looking for:
“You use a coil to pick up the signal from the reader and make it generate an interrupt every cycle. Then you use an interrupt service routine to modulate a load on the coil. You can do this by switching a resistor across it. The simplest way is to connect the coil to a pin through a resistor. Then for no load make the pin an input and for load make it an output and write low to it. ” – credit: Grumpy_Mike @ http://www.arduino.cc/cgi-bin/yabb2/YaBB.pl?num=1270528377/2#2
I think I found a bug in your code…
in setup():
EEPROM.write(i+2,cardID[i]);
Shouldn’t “i+2” be “i+3” instead?
You are overwriting the second byte of the facility-ID with the first byte of the card-ID on the EEPROM, and then, when you read it back – the last byte would be undefined…